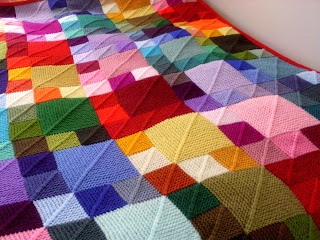
Yesterday I finished my odd ball
throw by adding a border.
For those of you who would like to knit your own version of it – I am including a pattern below.
The design consists of 7 strips
of 7 squares. Each square is made up of
5 small squares and 1 large one. As I
was using up odd balls – it is difficult for me to say how much yarn is
needed. As I said in my previous post –
you need golf ball size amounts for the small squares and tennis ball size for
the large ones.
You could do a completely random
colour sequence. I didn’t. For the first strip I did Blue, Green, Yellow,
Red, Pink, Mauve and Turquoise. For the
next strip I started 2 colours along – so I started with Yellow, and then Red,
Pink, Mauve, Turquoise, Blue and Green.
I continued in a similar way across the throw with the result that there
is large square of each colour in each row and in each strip.
Materials
Approximately 1200g of DK
yarn in various colours.5 mm needles
Size of Throw:
Size of one square (made
from the 5 small squares and one large one): approximately 21cm across and 22cm
down. The exact side of the throw will
depend on your tension. You can adjust
the size of your throw by adding more squares or adding a wider border.
You can knit 49 squares and
then sew them together, or you can knit 7 strips of 7 squares and sew these
together. I did not do any sewing. My throw was knitted as one piece from left
to right casting on or picking up stitches as necessary.
Small Square
Row 1: Using 5mm needles and
Yarn D, cast on 23sts.Row 2: K11, P1, K11.
Row 3: K10, S2K1PSSO (Slip 2sts, K1, pass the 2 slipped stitches over – decreasing by 2sts), K10.
Row 4: K10, P1, K10.
Row 5: K9, S2K1PSSO, K9.
Row 6: K9, P1, K9.
Row 7: K8, S2K1PSSO, K8.
Row 8: K8 P1, K8.
Row 9 K7, S2K1PSSO, K7.
Row 10: K7, P1, K7.
Row 11: K6, S2K1PSSO, K6.
Row 12: K6, P1, K6.
Row 13: K5, S2K1PSSO, K5.
Row 14: K5, P1, K5.
Row 15: K4, S2K1PSSO, K4.
Row 16: K4, P1, K4.
Row 17: K3, S2K1PSSO, K3.
Row 18: K3, P1, K3.
Row 19: K2, S2K1PSSO, K2.
Row 20: K2, P1, K2.
Row 21: K1, S2K1PPO, K1
Row 22: P3tog and fasten off.
For the second small square
- cast on 11sts and then pick up 12sts from the right-hand edge of the first square. Work as for first square.
For the third small square -
cast on 11sts and then pick up 12sts from the right-hand edge of the second
square. Work as for first square.
For the fourth small square
– pick up 11sts from the top of the first square and then cast on 12sts. Work
as for first square.
For the fifth small square –
pick up 11sts from the top of the fourth square and then cast on 12 sts. Work
as for first square.
Large Square
Row 1: Pick up 22sts along the
top edge of the third and second squares, 1 st from the top corner of the first
square, and then pick up 22sts from the side edge of squares four and five.
(45sts)
Row 2: K22, P1, K22.Row 3: K21 S2K1PSSO (Slip 2sts, K1, pass the 2 slipped stitches over – decreasing by 2sts), K21.
Row 4: K21, P1, K21.
Row 5: K20, S2K1PSSO, K20.
Row 6: K20, P1, K20.
Row 5: K19, S2K1PSSO, K19.
Row 6: K19, P1, K19.
Row 7: K18 S2K1PSSO, K18.
Row 8: K18, P1, K18.
Row 9: K17, S2K1PSSO, K17.
Row 10: K17, P1, K17.
Row 11: K16, S2K1PSSO, K16.
Row 12: K16, P1, K16.
Row 13: K15 S2K1PSSO, K15.
Row 14: K15, P1, K15.
Row 15: K14, S2K1PSSO, K14.
Row 16: K14, P1, K14.
Row 17: K13, S2K1PSSO, K13.
Row 18: K13, P1, K13.
Row 19: K12, S2K1PSSO, K12.
Row 20: K12, P1, K12.
Row 21: K11, S2K1PSSO, K11.
Row 22: K11, P1, K11.
Row 23: K10, S2K1PSSO, K10.
Row 24: K10, P1, K10.
Row 25: K9, S2K1PSSO, K9..
Row 26: K9, P1, K9.
Row 27: K8, S2K1PSSO, K8.
Row 28: K8 P1, K8.
Row 29 K7, S2K1PSSO, K7.
Row 30: K7, P1, K7.
Row 31: K6, S2K1PSSO, K6.
Row 32: K6, P1, K6.
Row 33: K5, S2K1PSSO, K5.
Row 34: K5, P1, K5.
Row 35: K4, S2K1PSSO, K4.
Row 36: K4, P1, K4.
Row 37: K3, S2K1PSSO, K3.
Row 38: K3, P1, K3.
Row 39: K2, S2K1PSSO, K2.
Row 40: K2, P1, K2.
Row 41: K1, S2K1PPO, K1
Row 42: P3tog and fasten off.
You should have now
completed one square made from 6 squares. If you want to knit strips or the throw as
one piece, you will need to continue repeating the shapes – but you should pick
up stitches where possible instead of casting them on.
Finishing
Sew in any ends darning any
holes between the squares.
Borders
For the top and bottom of
the throw: using 5mm and DK; pick up 231sts from the edge and work in garter
stitch for 4 rows. Cast off.
For the side edges: using 5
mm needles and DK, pick up 237sts from the edge (231 as before and then 3 more
on the edge of the top and bottom), and work in garter stitch for 4 rows. Cast off.


No comments:
Post a Comment