An English Adventure – Day 34
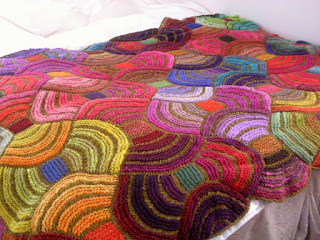
The throw is finished and I have
typed up a pattern. I think it makes
more sense if you look at the photos.
In the end I did just put an edge
on the modules which didn’t have one.
On Saturday I went to a Knitting
and Crochet Guild meeting in Reading and the topic was Modular Knitting. I finally got to see a copy of the African
Adventure pattern – I noticed that a module has 31 sts – so they are smaller
than in my version. I assume the pattern
uses thinner yarn and smaller needles as well but I did not look at this.
My version of the pattern is
shown below. I just want to tell you
about colours. I roughly used parts of 2
balls of Kureyon for a section and then used the rest of both balls for another
section – and there was still some left over which could be used for edge
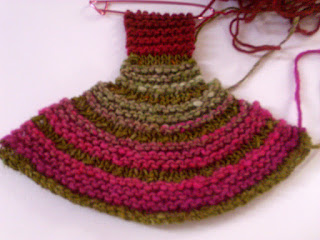
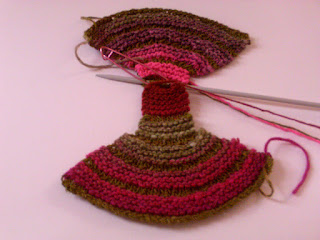
modules or for the garter stitch joining pieces. I am repeating some of my photos to make the
instructions a bit clearer.
English Adventure Throw Pattern
Materials
7 x 50g balls of Noro Tokonatsu (Yarn A) – Colour 10
Approximately 16 x 50g balls of assorted colours of Noro
Kureyon (Yarn B) – including Shades: 374, 124, 344, 272, 352, and 319.
6.5mm needles
Stitch holders (or spare needles)
Measurements
Width: 54” (137cm)
Length: 84” (208cm)
Row 1: Using 6.5mm needles and Yarn A, cast on
40sts.
Row 2: K1, purl to last st, K1.
Attach Yarn B (carry Yarn A up the side of the module
until you need it again).
Row 3: K2tog, knit to end. (39sts).
Row 4: K2tog, knit to end. (38sts).
Rows 5-8: Knit.
Using Yarn A (carry Yarn B up the side of the module
until you need it again).
Row 9: Knit.
Row 10: K1, P1, (P2, P2tog) 8 times, P2, K2tog. (29sts).
Using Yarn B
Rows 11-16: Knit.
Using Yarn A
Row 17: Knit.
Row 18: K1, (P1, P2tog) 9 times, K1. (20sts).
Using Yarn B
Rows 19-24: Knit.
Using Yarn A
Row 25: Knit.
Row 26: K2tog, (P2tog) 8 times, K2tog. (10sts).
Using Yarn B
Rows 27-32: Knit.
Using Yarn A
Row 33: Knit.
Row 34: K2tog, purl to last st, K1. (9sts).
Cut off Yarns A and B, and using a contrast colour of
Yarn B, Knit 12 rows of garter stitch (Knit every row). Transfer these 9sts to a stitch holder.
Module 2
Work as for Module 1 until 34 rows have been completed. Then
use the 3-needle cast off method to join Modules 1 and 2 to form an egg-timer
shape. (Alternatively cast off both
modules and sew them together).
Module 3
Using Yarn A, pick up 40sts from the right-hand one side
of the joined Modules 1 and 2 and work as for Module 1.
Module 4
This is an edge module and is slightly narrower than
Modules 1-3.
Work Rows 1-26 as Module 1.
Row 27: K2tog, knit to last 2sts, K2tog (8sts).
Row 28: K2tog, knit to last 2sts, K2tog (6sts).
Row 29: K2tog, knit to last 2sts, K2tog (4sts).
Row 30: K2tog, K2tog. (2sts).
Row 31: K2tog and fasten off.
These 4 modules form the first section - the throw has 3
sections across its width. For the
central section you will need to repeat Module 3 instead of knitting Module 4
and for the third section you will need to knit Module 3 on the left-hand side
and Module 4 on the right (at the edge).
You will need to knit a garter stitch linking piece to join the modules
horizontally.
The photo below shows a middle section without edge modules but with a joining piece on each side.
When you are happy with the appearance of a section – I
recommend that you weave in ends rather than leave all to the end.
For the next 2 sections – you do not need to knit edge
modules because they fit between the sections below – so all the modules are
the same.
For the third row of sections – you will need to include
edge modules again. The throw consist of
7 rows of sections (70 full modules and 12 part modules). You will need to knit 4 more part modules to
complete the edges at the top and bottom of the throw.
When you are knitting the sections, you can pick up from
the modules that you have or you can knit them separately and sew them together
afterwards. There will always be some
modules which need to be sewn together.
My throw consists of 7 rows of sections. The full throw contains 70 full modules, 12
incomplete modules (like Module 4) and 35 garter stitch joining pieces.
Edging
An edge was only added to the modules which did not have
one. Using Yarn A and 6.5mm needles,
pick up about 34sts from the edge of the module - purl one row and cast off.
Finishing
Sew in any remaining ends. Block the finished throw.


